Cool Drawings of Eyes Tumblr
Cartoon Ideas For When You're Out Of Ideas
I created a quick walkthrough on my process! You lot can practise the same with any digital art plan and brushes yous like. As e'er, learning comes with disquisitional thinking and if you feel this does not use to y'all, then no worries! In that location'south no correct way to practise things as long equally you achieve the results yous want.
The technique tin can be customized with unlike brush types and colours, and can be every bit simple or heavily rendered every bit you so want. I promise information technology helps a trivial! I like to exercise lighting like this in my own work for a sense of atmosphere.
Please ignore the fact I spelled complementary wrong, it's been a long week ok lol
iamstillonhere asked:
oh man dude i really dearest how you did the lens flare for the free! tron affair-- how'd you do information technology?

ninjas-are-the-shit asked:
Pitiful if you've answered this before merely: I really look up to y'all and was wondering how you lot started to sympathise colour began coloring really well? Do you take any advice :0?

bogarthhgh answered:
Thank you small one :,) I'm still learning myself, so excuse me if I fuck anything upwardly or give bad tips for yous here.
FIRSTLY, never never never EVER shade with black, or highlight with white.
Trust me on this, it volition end up looking like Satan's aborted fetus unless you
a.) are attempting realism or
b.) know what you're doing
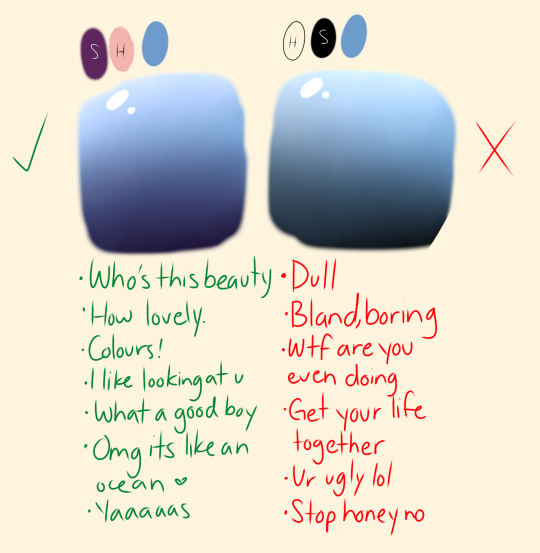
Your cartoon will terminate up looking really dull and un-keen if y'all join the 'Shade And Highlight Your Drawings Like They're A Really Irksome Person' cult. Shade and highlight equally if these drawings are a gorgeous, interesting, in-depth book. Juicy like your s/o's ass.
Another tip is to sympathize where your light source is.
(Don't mind that information technology's a dick that's none of your business fool )
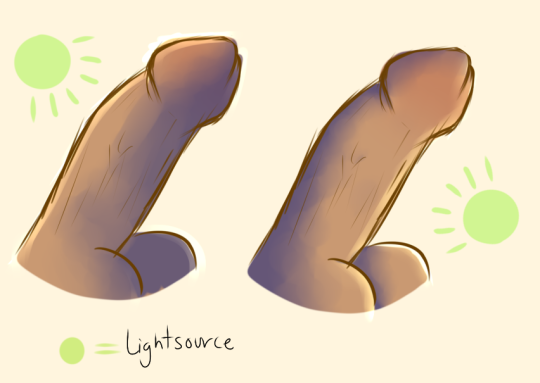
As you tin can see, the shadows variate depending on where the light is hitting the doggy. It's unproblematic once yous call up about it. I recommend playing with different shapes (cubes, prisms, or even still-life) and observing how light behaves on them. Whip your cock out in the bare lord's day and stare until you understand. I tried it once it works.
I'm clearly not the best at it, just I think I got the basics down. Meet? Don't I sound like I know what I'm talking about? Cause I do. Aren't I a fucking genius?
Lastly, don't use harsh colours.
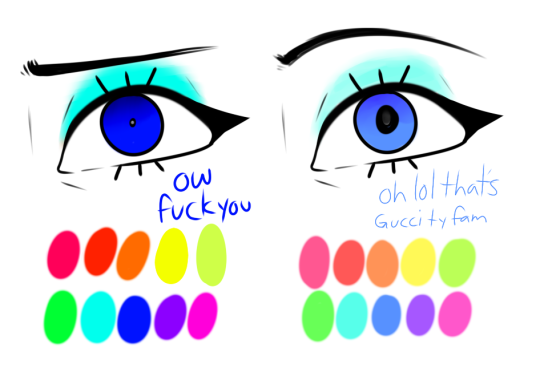
Expect how saturated the first palette of colours are. I bet they hurt your eyes, huh? By decreasing your saturation past like, 8%, you tin can make art without killing both your eyes and your audition'south. And it doesn't fifty-fifty modify the hue!! HELL yeah! Thank fuck for that. Your art tin can still be Gucci without causing an unbearable eyestrain.
Harsh, saturated colours = a bad time. Hashtagnothankyouamirite??
(Keep IN Heed ANY OF THIS CAN CHANGE DEPENDING ON YOUR Way. THERE ARE NO RULES TO COLOURING, DESPITE WHAT THEY TAUGHT You IN KINDERGARDEN. Simply HAVE FUN. SKILL CAN ALSO TAKE A LONG Time TO MASER, Then IT'S IMPORTANT TO Exist PATIENT AND NOT Trounce YOURSELF UP IF YOU DON'T THINK YOU'RE GOOD Enough. Go along PRACTICING! South H A P E S !!)
Well anyhow, this is the stuff I go on in mind when I'm colouring. Promise information technology helps ❤️ This is all I could think of so feel complimentary to add more if any of you guys feel the need to. Bye I'm tired.

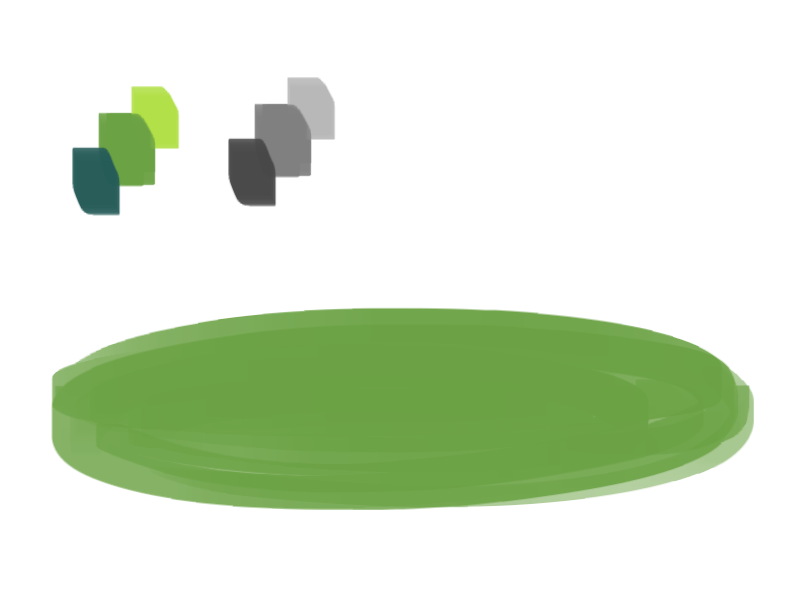
a quick grass tutorial
I've never really wrote a tutorial before so apologies if this is bad
1. okay first thing I do is pick 3 colors, a mid, dark, and light. I like to check the colors in greyscale to make sure there's plenty contrast between each one.
I then plop down a blob of whatsoever my centre tone color is.
two. next, I take my night color and but sort of randomly place it around. I effort to make sure at that place'southward a adept amount of both the mid and dark tones spread throughout. I personally like to keep information technology kinda messy. I besides take pen pressure on for both brush size and opacity, and so I can have some blending action going on.

iii. for the next step I practice the verbal same thing as before, except with the light colour.

iv. aight this is where nosotros beginning adding details. see how you merely have a bunch of colors and edges where 2 colors meet? utilise the eyedropper and go to an expanse where two colors meet, eyedrop a color, so utilize that color to depict in your grass blades. I practice this at every point where colors run across. should note I personally like to employ a square brush, but you can really just utilize anything.

5. you tin can technically stop at the concluding step if you're going for a more simple await, merely to add more details I become to the "empty" areas of solid color and simply depict in random strokes using a color nearby. information technology's merely a way to fill up the empty space.

half-dozen. basically more than of the aforementioned thought of eyedropping and drawing. for more than variety so things look interesting, I like to add random plant shapes.

7. and so the grass doesn't wait too plain, I add random dots of color and pretend it'due south flowers and stuff.

and there you have information technology, this is how I approach cartoon grass.
I'm sure a ton of people already know how to practise this, just I only learned recently, so I wanted to share one of my favorite thumbnailing tricks! Color matching is SUPER helpful to chop-chop map out potential color schemes :D
[EDIT] this is in Adobe Photoshop, distressing for forgetting to mention that!
Let's talk nigh mynoise.cyberspace
Have y'all ever been listening to Rainymood and thought, "Aye, this is skillful … but it would be squeamish if I could customize the sound more than, or if there was a picayune more choice.
Let me introduce you to MyNoise.
MyNoise is a customizable sounscape looper with so many options, even inside each soundscape. So say, for case, you lot really love rain sounds when you write or study or relax. Annihilation. I know I'm a large fan of rain sounds. They take a page for that.
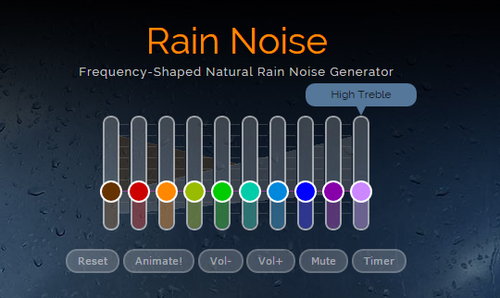
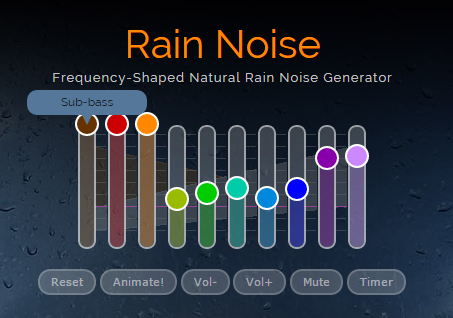
But say you like really high, pattery rain, and LOTS of low thunder.Hither's where MyNoise really stands out: you tin customize that.See those sliders with all the cute colors? That is your equalizer. You canadjust the levels based on what yous want to hear more and less of.Here'due south how it looks when you lot want high, pattery pelting and low, rumbly thunder:
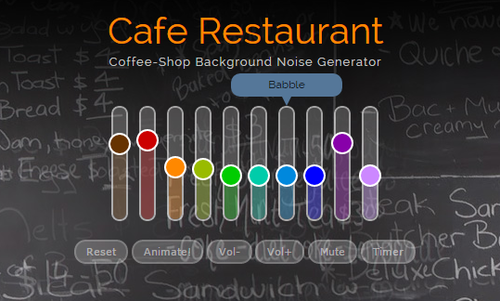
But say rain isn't really your jam. Say you lot want something a petty more ambient, a piffling more groundwork noise-y. Something with people. Well, they have customizable java house chatter that fifty-fifty has the levels listed for things like "kitchen," "babble," and "tabular array":
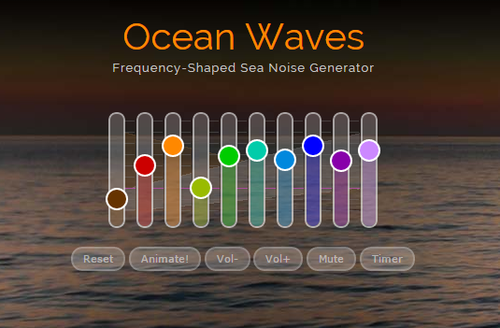
Or say you miss the ocean.
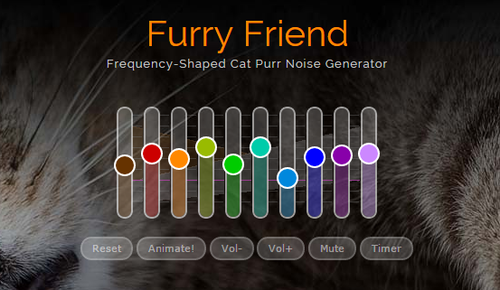
Or say you miss your cat.
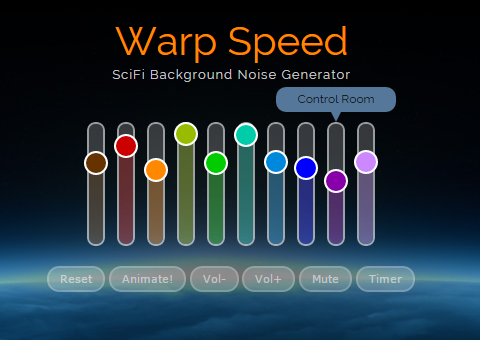
Or say you miss your spaceship.
Or say you miss the dungeon where you and your team of scalawag adventurers used to explore and face off confronting, say, dragons. In the dungeon.
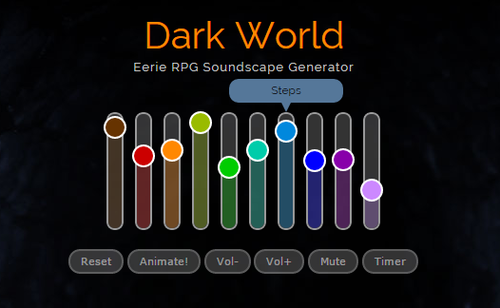
This site is seriously so helpful, and those are merely afractionof every kind of sounscape the site has to offering. The best part is that if you want to layer it with music (for instance, I'll layer a playlist + rain + coffee shop if the scene I'thousand writing takes place in a coffee shop), y'all tin can adapt the main volume, meaningall of your layers stay at their respective volumes, just louder or quieter.
Enjoy!
Y'ALL I Only STARTED USING THIS TODAY BUT THIS HAS BROKEN THROUGH MY WRITER'S BLOCK LIKE NOTHING ELSE.
TRY IT. Apply Information technology. Dearest Information technology.
I use this!!
Pinkish noise is crawly for helping me sleep as well.
Bearding asked:
Oh my stars your art is astonishing!!! Do you lot think maybe y'all tin make a shading tutorial sheet? owo
![]()
gaelfox answered:
Hey in that location Anon! Certain thing! I'll do my best to explain the process of how I commonly do things in regards to coloring and shading. I'm not the greatest at Explaining, so I'll do my best to keep things as crystal articulate as possible!
Step i: Lineart
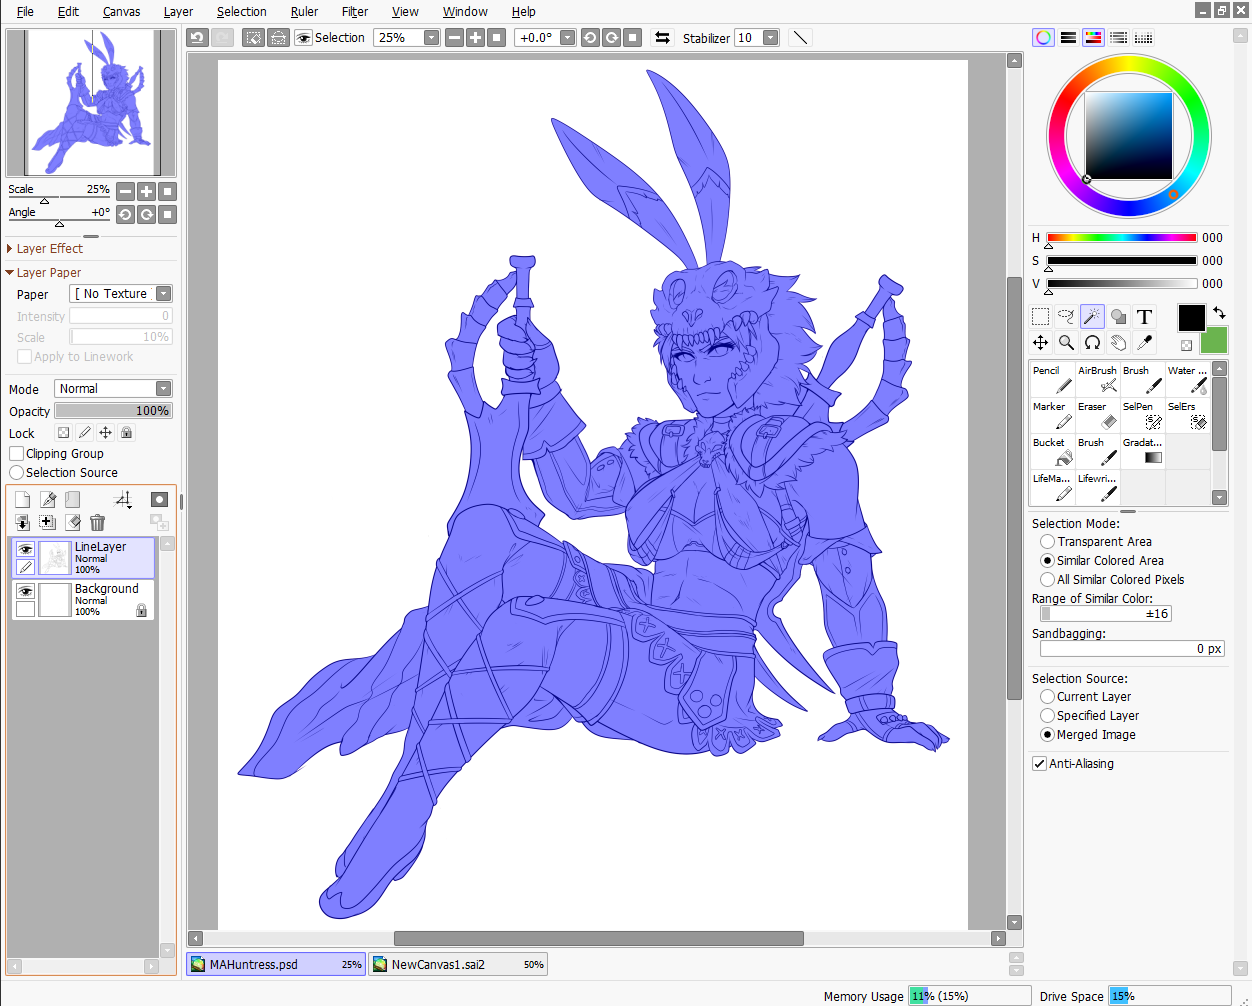
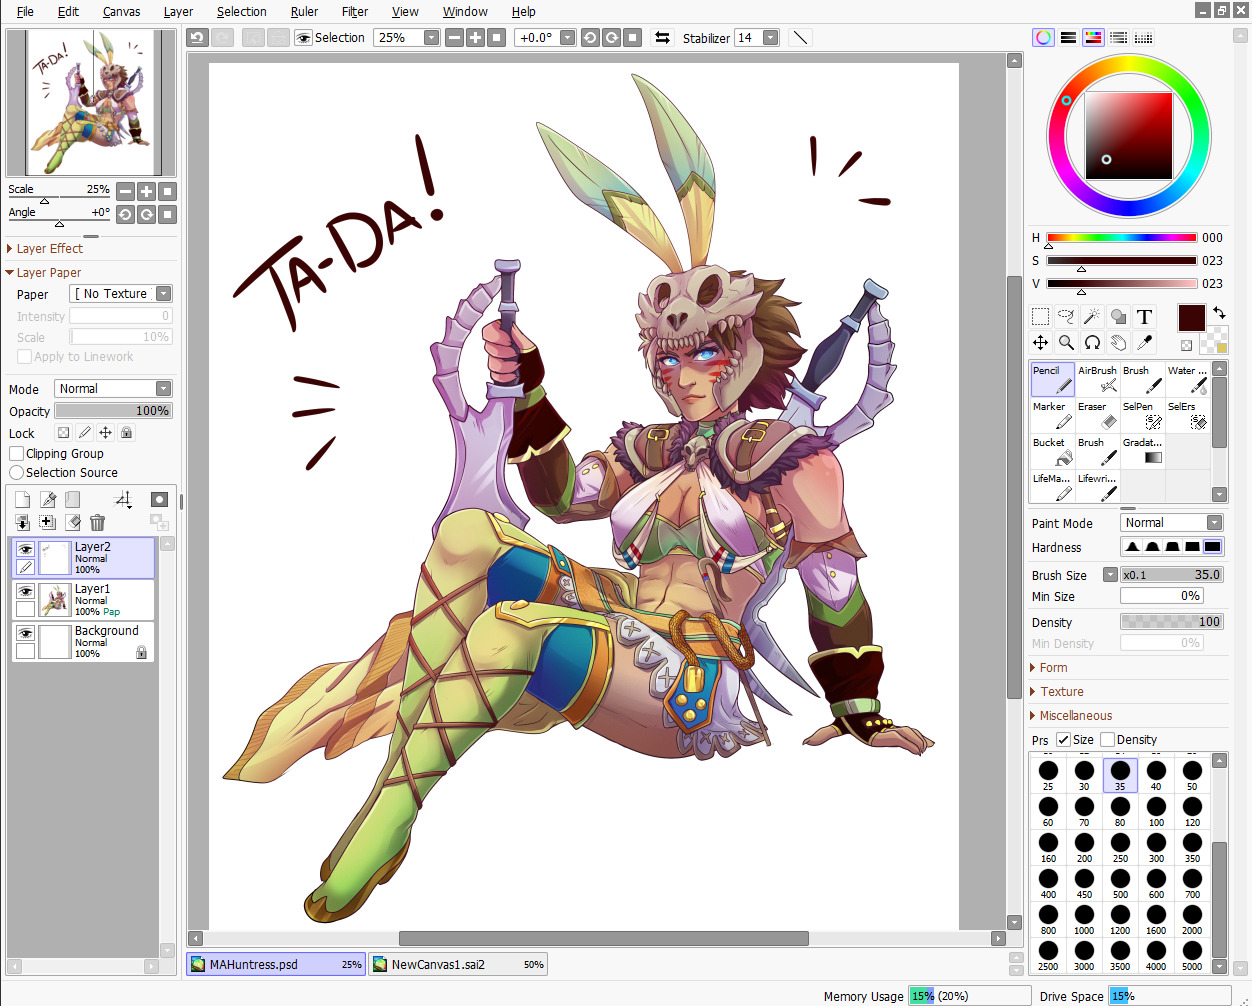
I'll beginning with Lineart purely because this pace is important to the coloring process in i regard, and that is making sure the entire line layer is closed without whatsoever holes. Fifty-fifty the smallest little gap volition make the selection process hard later, and we don't want that. So the cleaner lineart you have, the better. I'yard going to go ahead and use my Monster Hunter Generations Huntress for this.
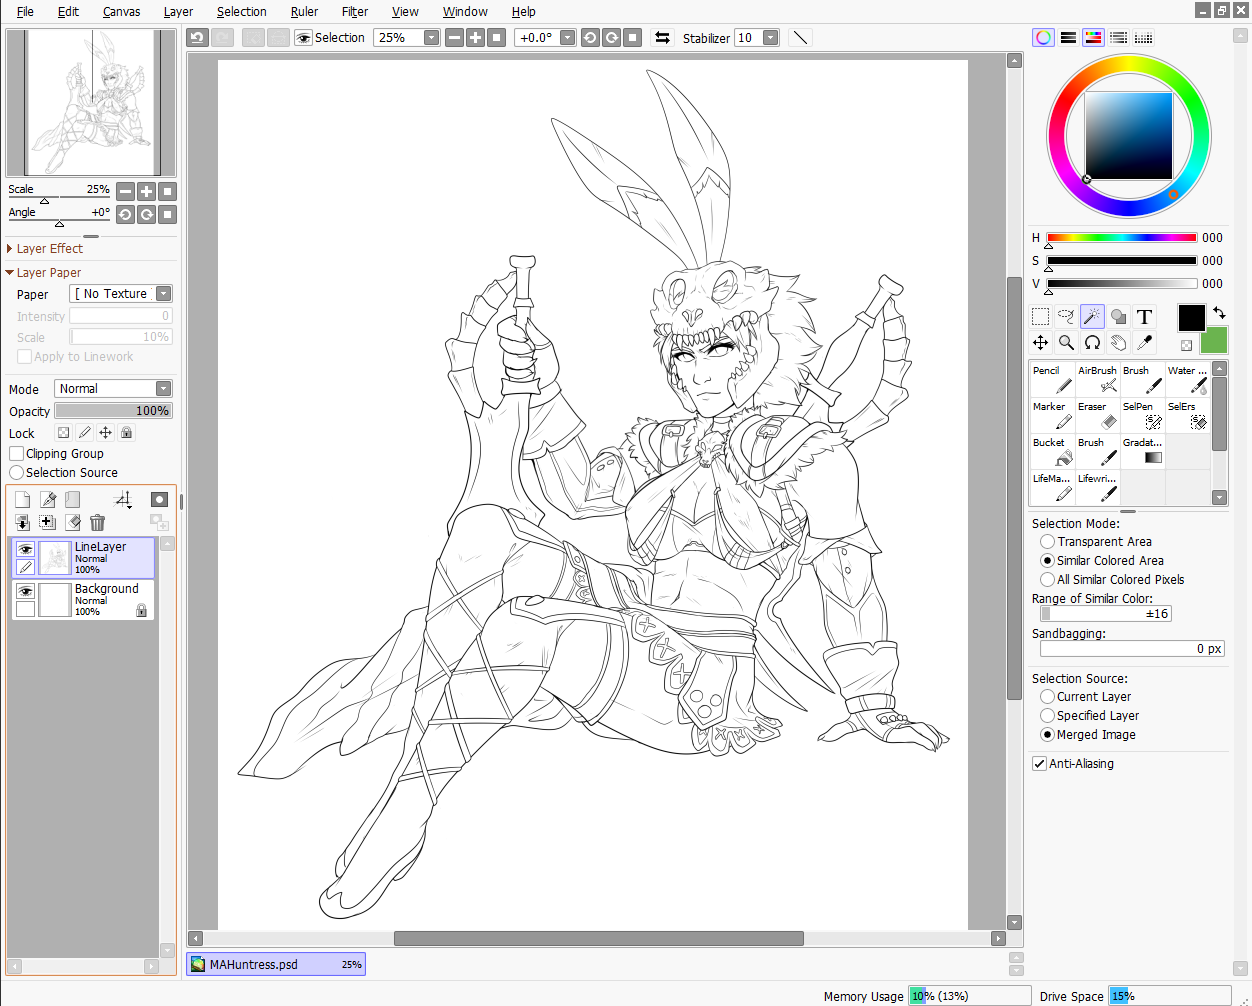
Step two: Selection
Either in Photoshop or SAI or whatever you use, click outside your character and whatever other negative space surrounding them. This ways…basically anything that's not your character. So go to Selection > Inverse and invert the choice. You should have something similar to what I have below. This makes it so much easier to add colors without having to worry about all the petty nooks and crannies that could mess the cleanliness of the drawing up real bad.
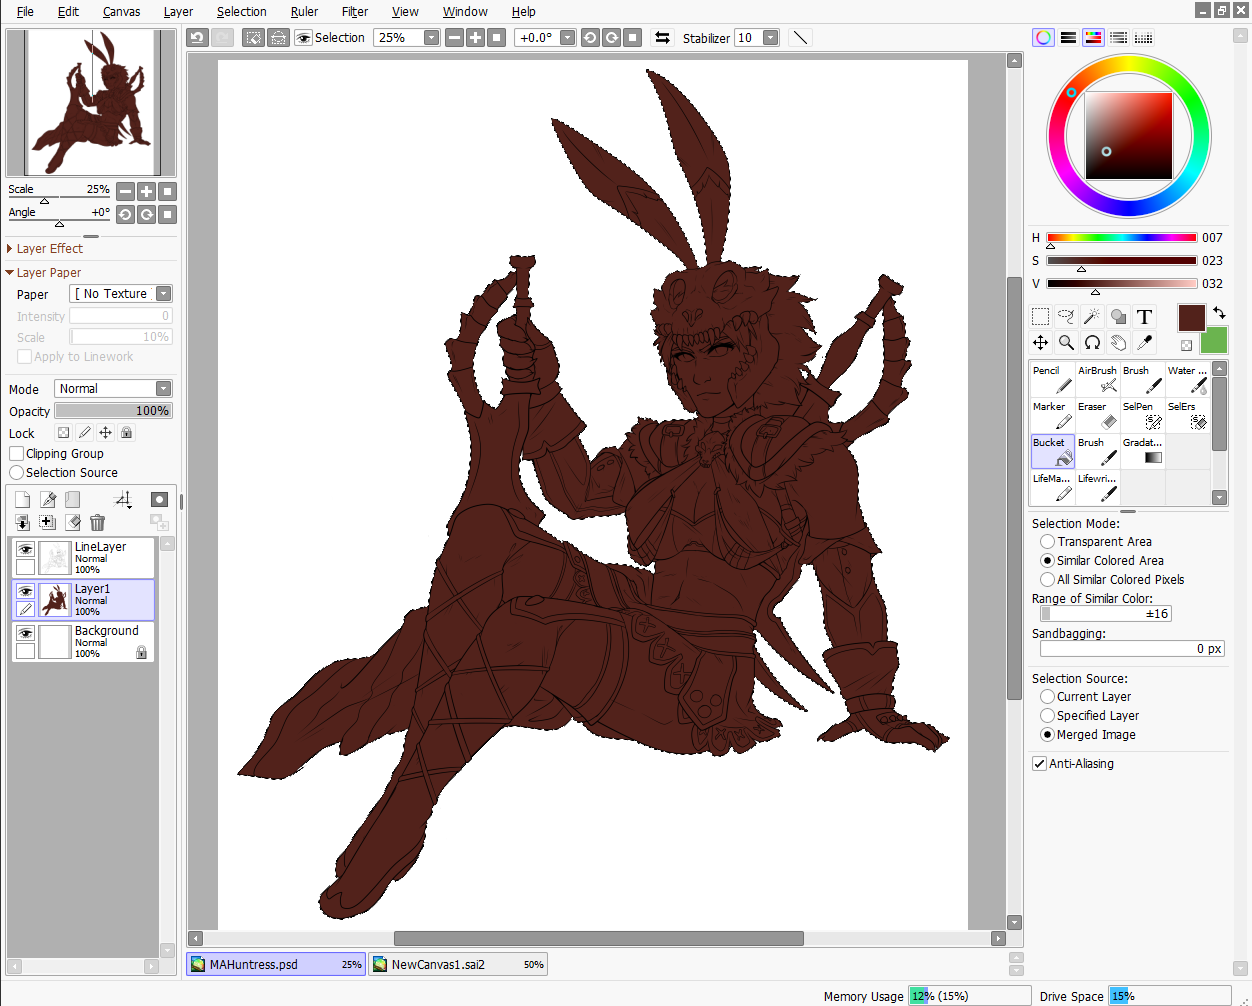
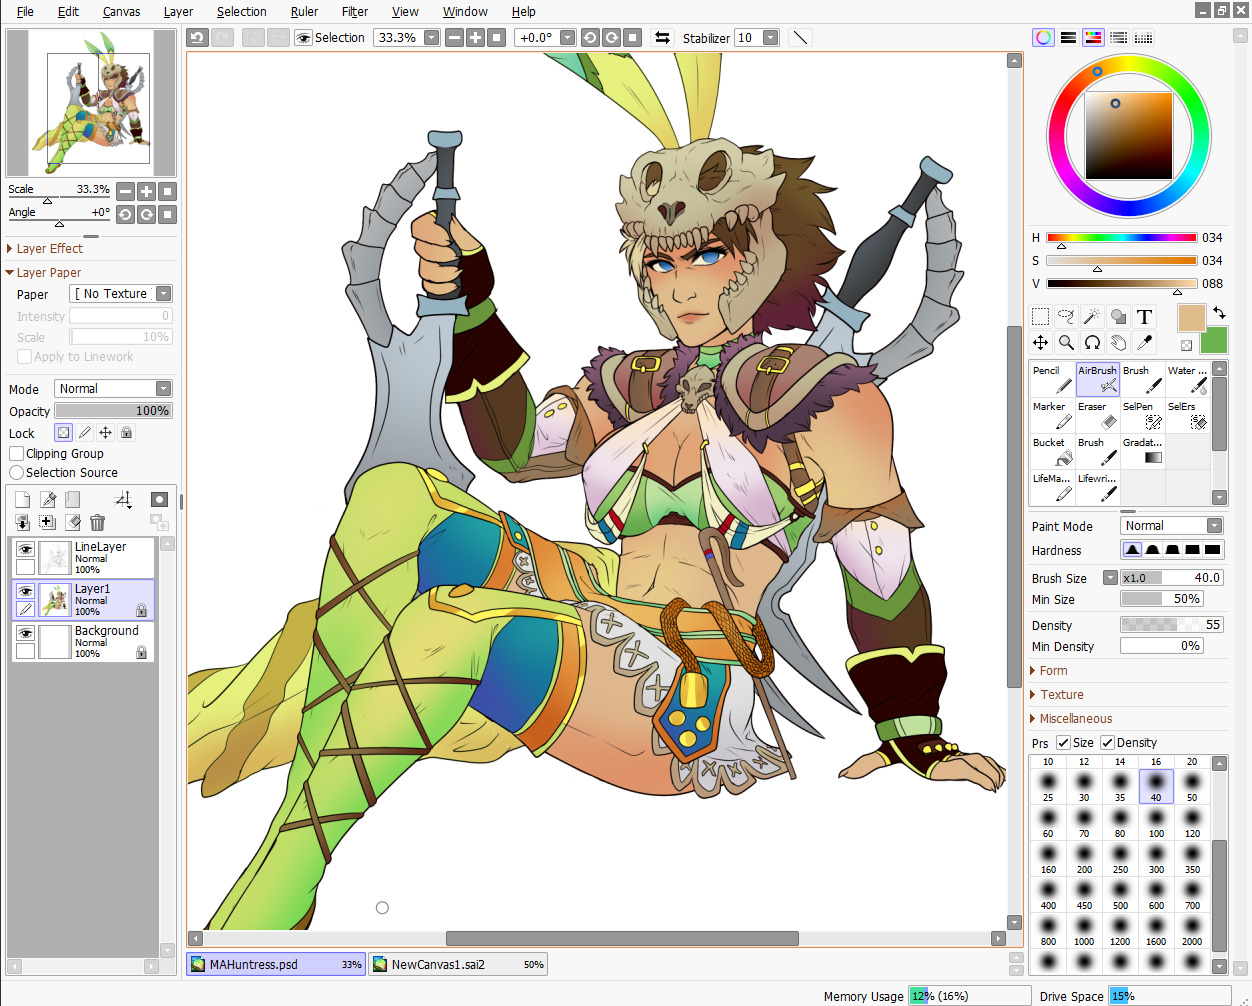
Footstep iii: Flat Base
Create a new layer beneath your line layer with the option notwithstanding active. This will exist our color layer. Remove the visibility of the line layer, and fill the remaining "Silhouette" with a dark base color. This makes those nasty corners wait a bit cleaner, every bit sometimes if in that location is a lighter colour your figurer volition want to make them stand up out pixelated. Again, this is but for cleanliness beneath the line layer. Turn your line layer dorsum on, equally they will now act equally barriers for the fill bucket tool. Make certain the entire silhouette is filled, and that no lines were accidentally selected! You lot want a encounter a completely filled and flat colour if you turn the line layer off.
Stride 4: Flat Colors
At this signal y'all can lock the transparency of your Color Layer, and go ham. Either with the pen or a fill bucket, effigy out how yous desire to color your grapheme and add in the flat colors. Notice I'm on the same layer as the Base that we made. This is so those lines still play nicely with one another. Make clean up where necessary.
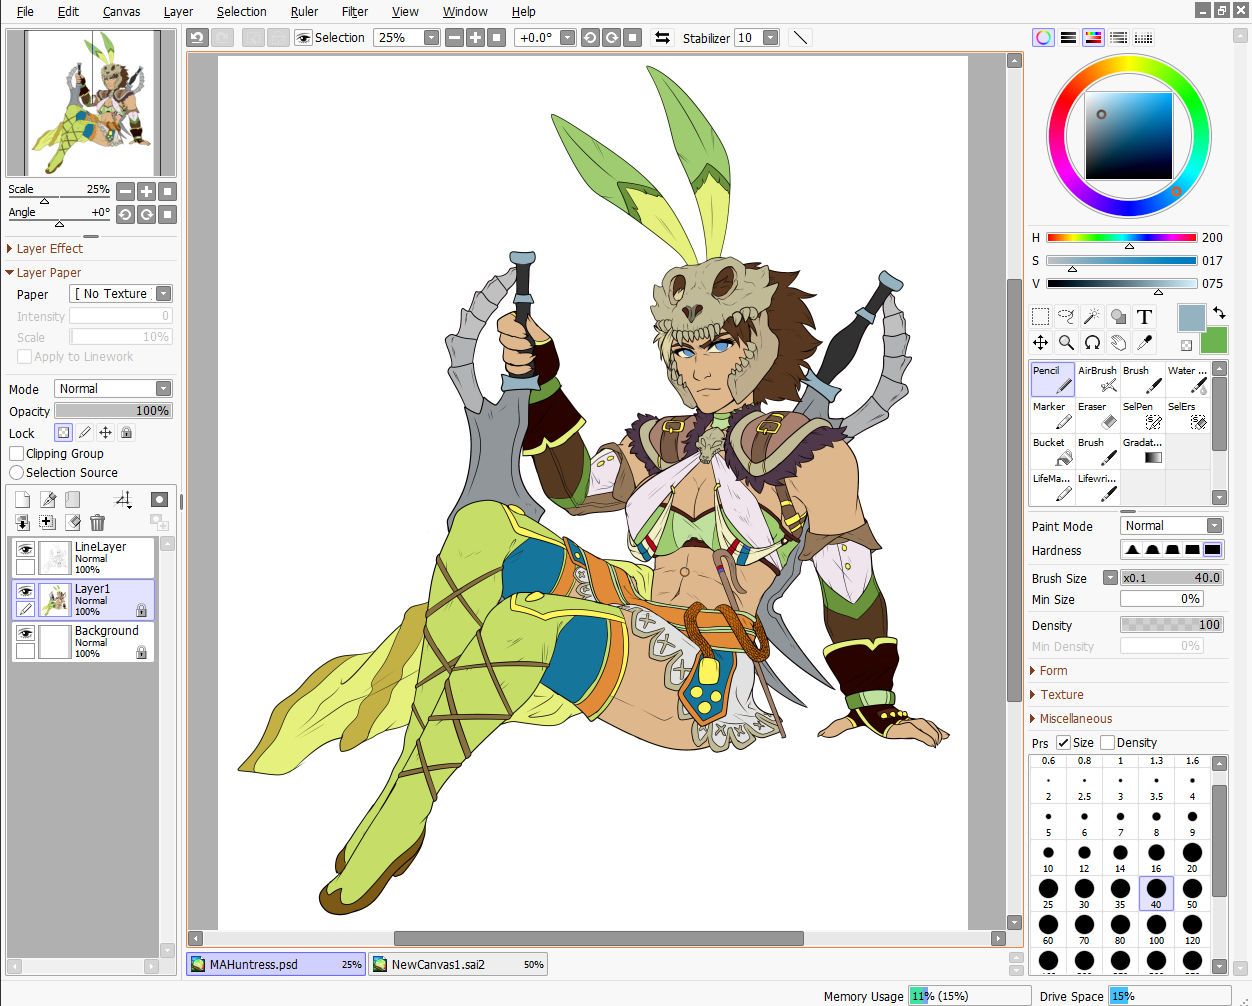
Step 5: Analogous Color Gradient
Well, we don't actually want our grapheme to be too flat, practise we? This is where the color bike becomes your best friend. Select similar colors with the Magic Wand (like I've washed her skin tone here) and using the color cycle, choose an analogous (that ways "close past" in color wheel terms) color to add a bit of depth to the color. For peel, I usually go with a red or a statuary, sometimes purple. Use the airbrush for this. Then, deselect and select another color to gradient, until all the colors have some degree of new color to them.
Run across? Now things await interesting! We added some blue to the greens, some purples to the reds, some blues to the grays so on and so along.
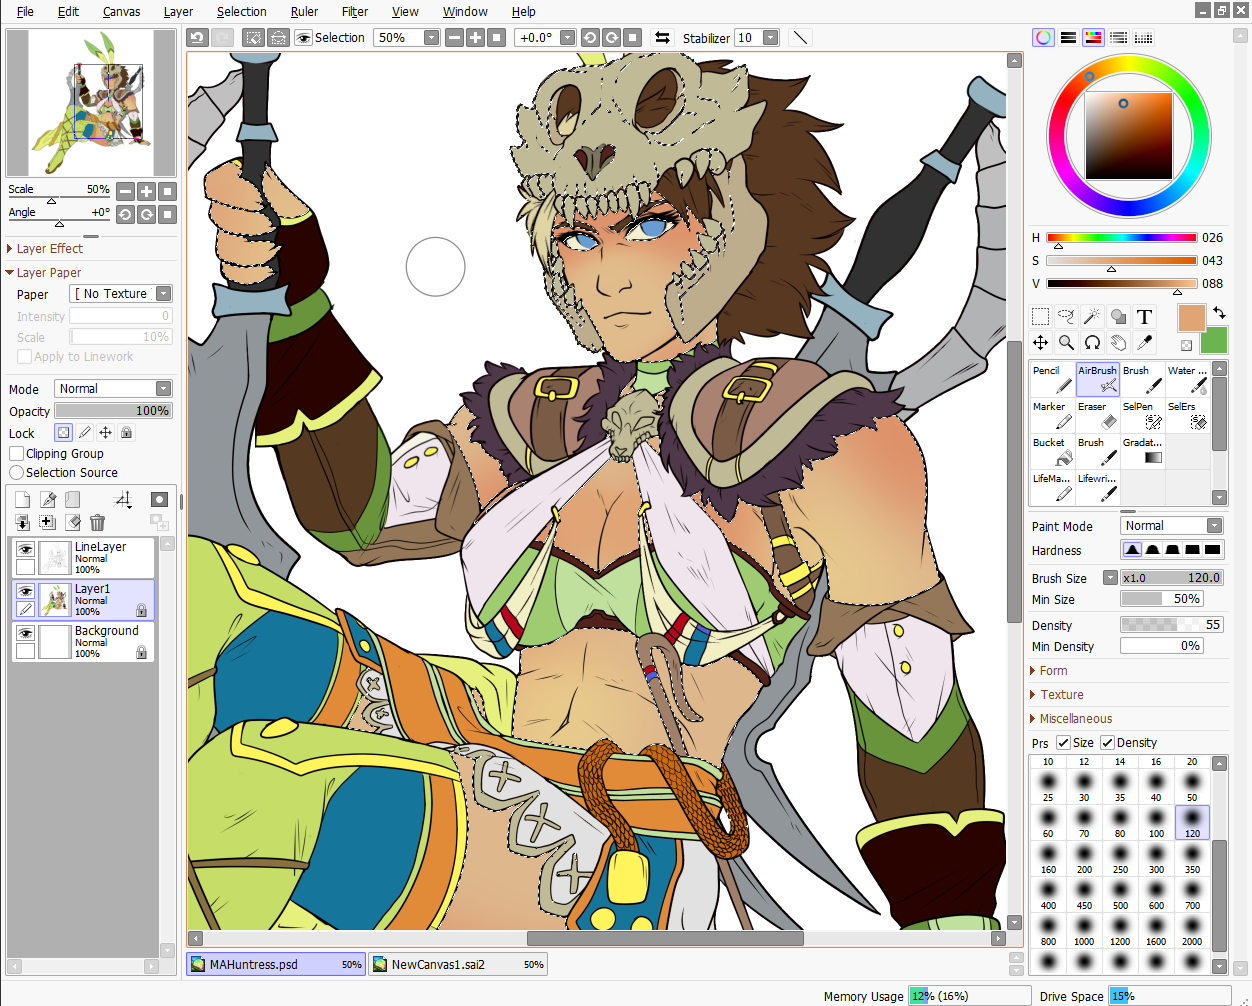
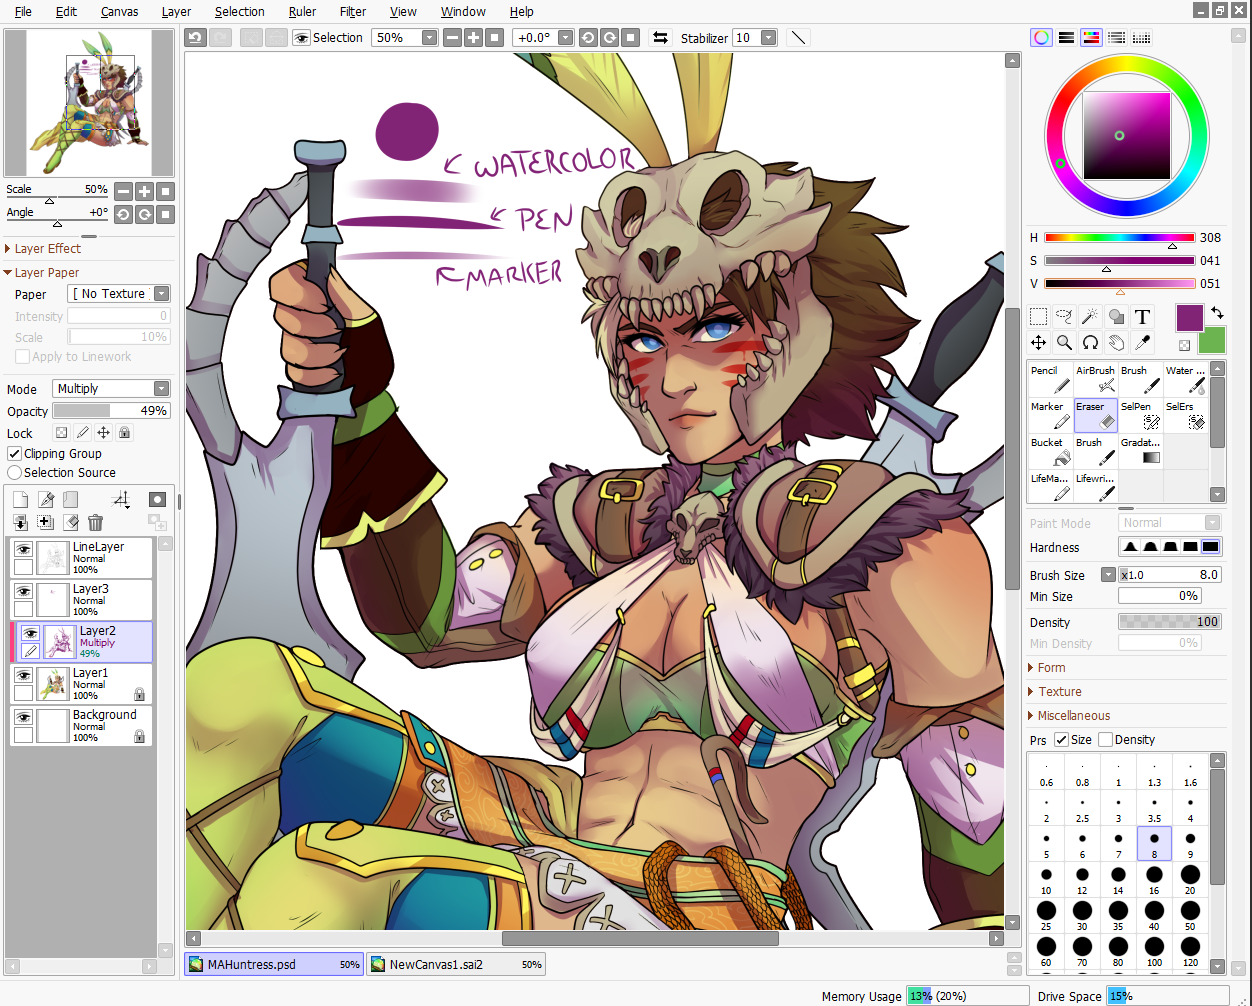
Step 6: Shading
Okay, here's where things get interesting. Time to shade. Brand a new layer betwixt the Line Layer and Color Layer, and make sure you lot get in a clipping grouping/clipping mask. This is so it won't go anywhere that you don't take colour. Set up it to multiply or linear fire (whichever you recall looks best) and bump the opacity downward to about 40-50%. Choose a color (or colour-value gradient, if you take drastic value changes in your piece that brand low-cal and night values not play well with the single color you picked, and swap between those) that you want the shadows to be; I like deep pinks and purples. Avoid Black. I first use the Pen tool to get down "hard" shadows - shadows cast by hard materials, shut shadows, and inorganic materials. Once I've got those down, I head on over to the softer areas, such as the peel, pilus and cloth and alternate between the watercolor and marker tools to give "softer" shadows. At that place's no existent law to this, you just have to know where shadows fall and how they bear and work with those three tools to get the look you want.
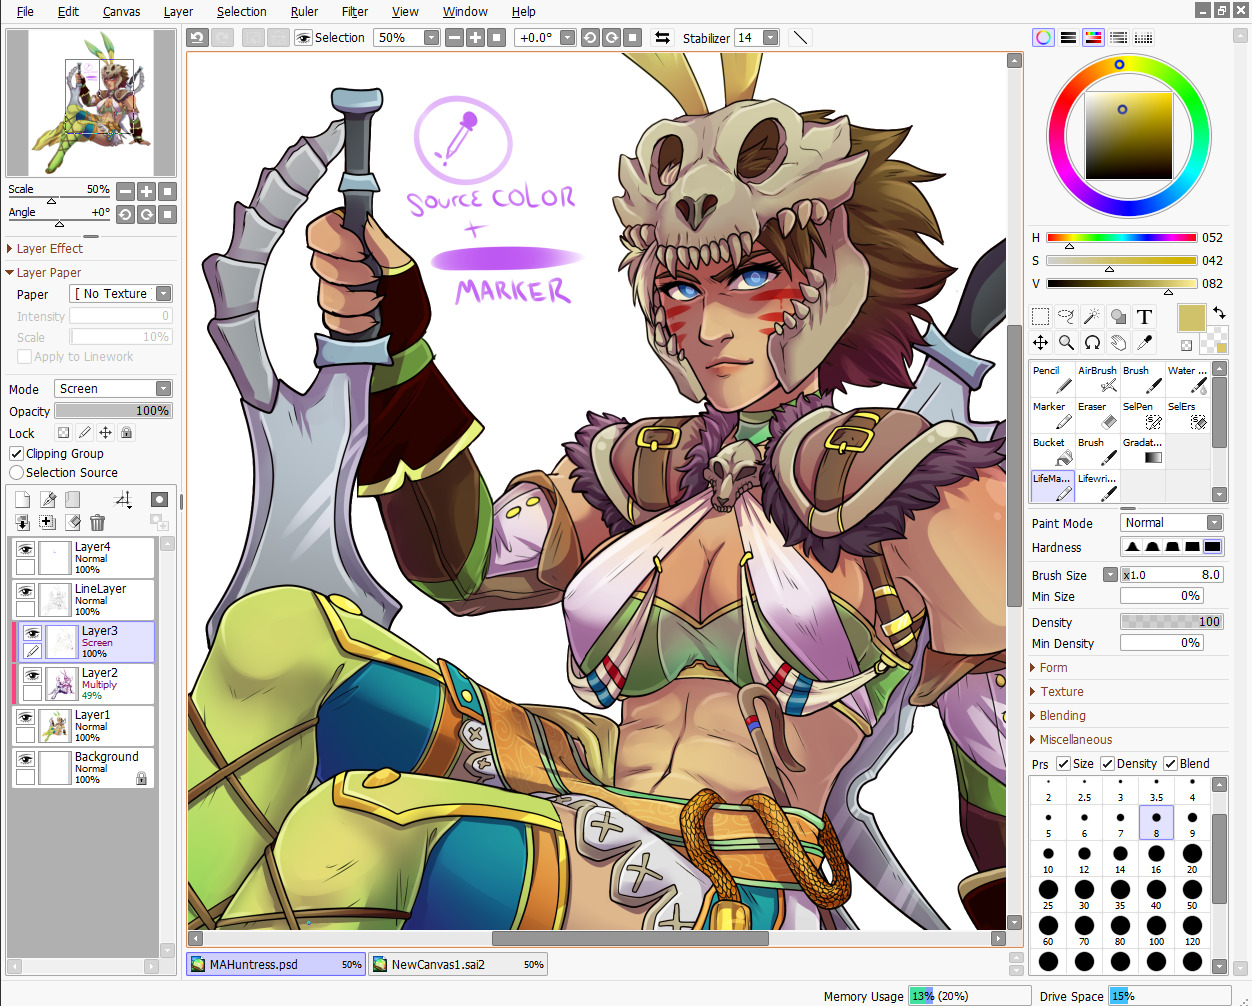
Step vii: "Highlights" - Rim Lighting
Okay, these aren't really "highlights" in the correct sense, but adding sort of "rim lighting" around forms actually helps make a motion picture pop. To practice this, make another layer above the shading layer, fix information technology to "screen" and go on the opacity at 100%. Then, get really familiar with your CRTL key because you're going to be color sourcing a lot. To add a rim light to a form, select the base color of that form, and use the marker to trace along the edges. For case, I picked upward the nude from the skin, the silver from the dagger, the gold and maroon from the hair and the tawny brown from the skull to use on those specific objects. Any place yous desire clean works well, but the edges of forms works all-time for this technique. Additionally, if you'd like, you tin create another layer above the Screen Layer and set information technology to Linear Dogde, and practice my "glowing eyes" technique on annihilation you want to stand out, such equally the metallic of the belt, gold objects and of course, eyes.
Step 8: The Overlay
Almost done! While your photo can now stand up solitary as "finished", at that place'southward i more than thing that I enjoy doing, and that's adding a simple color overlay to bring the whole picture together. This is done by flattening all the layers you accept so far (you'll want to "Merge Down" in order from lesser to top or "Flatten" to avoid the layers going crazy on each other) into ane layer. And so, make a layer on peak of that one, set it to a clipping mask, and set information technology to "overlay". With the Airbrush, choose some colors (I prefer soft pinks, blues and violets) and go forth the "edges" of your grapheme with a BIIIIIG brush. This kind of resembles soft ambience lighting or shadows. I simply think it makes the photo look nicer.
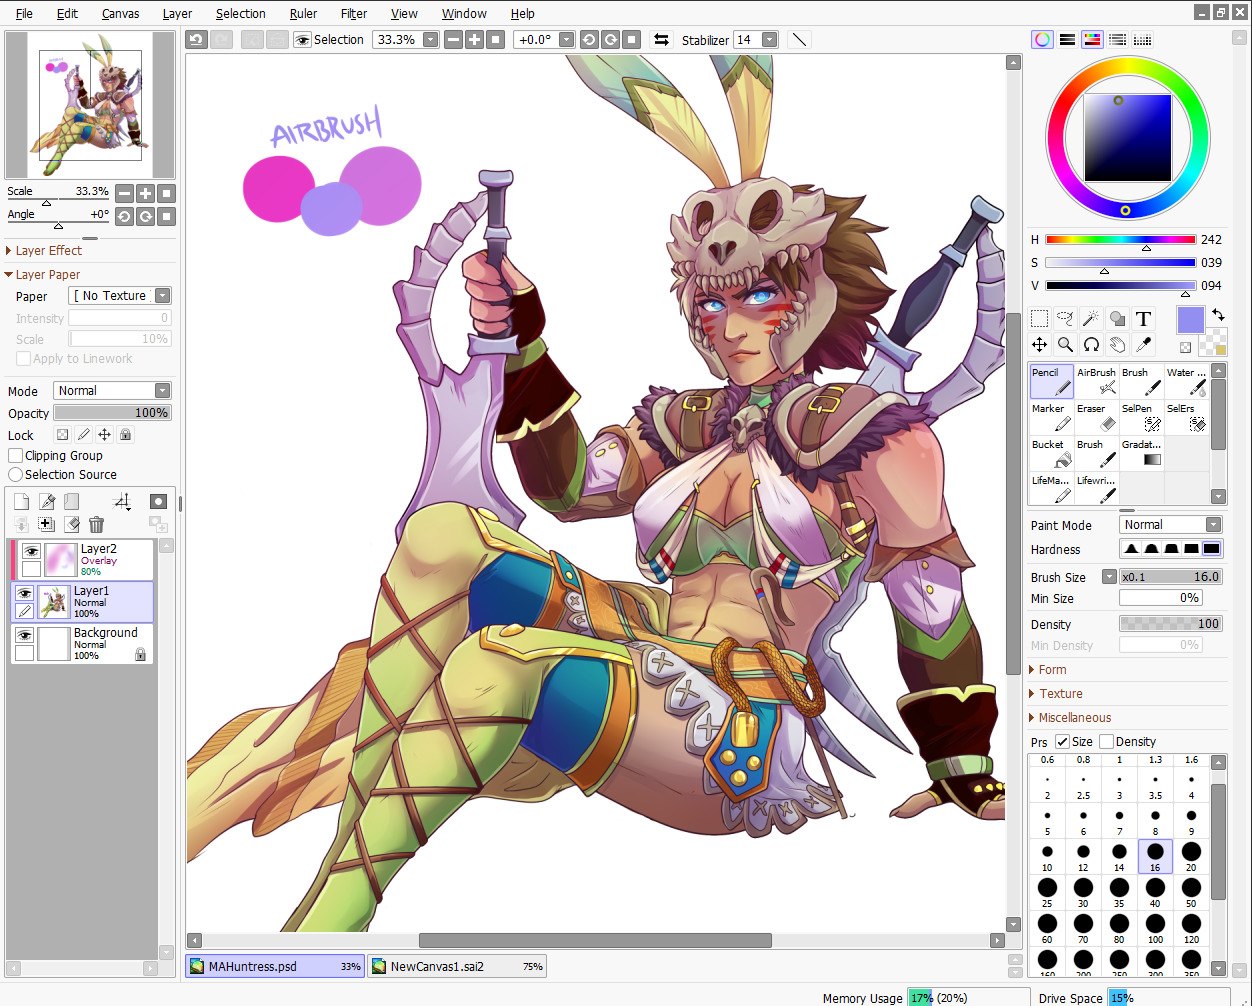
TA-DA! And Now nosotros're done!
And there nosotros go! I hope that helped, and I also apologize cause this enquire saturday in my box for awhile and I never got around to it until now. :P
I'd be happy to reply whatever questions y'all have, but this is the simple nuts! Remember to practice practice PRACTICE!
-Gael


I did an heart drawing tutorial!! Tools are paint tool SAI and wacom intuos art
Source: https://drawing-suggestions.tumblr.com/
0 Response to "Cool Drawings of Eyes Tumblr"
Enviar um comentário